Chapter 7. Printer Configuration
This chapter provides information on configuring, testing, and modifying a local printer with printconf. For information on configuring other types of printers, creating printer aliases, and more, see Official Red Hat Linux Customization Guide or click on the Help button once you open the printconf application.
Red Hat Linux no longer includes printtool. The printconf utility has replaced printtool. The printconf utility maintains the /etc/printcap configuration file, print spool directories, and print filters.
To use printconf, you must be running the X Window System and have root privileges. To start printconf, use one of the following methods:
On the GNOME desktop, go to Main Menu => Programs => System => Printer Configuration or, in the Nautilus Start Here screen, click on System and then on Printer Configuration.
On the KDE desktop, go to Main Menu System => Printer Configuration.
Type the command printconf-gui at a shell prompt (for example, in an XTerm or a GNOME terminal). [1]
You can also run printconf as a text-based application if you do not have the X Window System installed, or you just prefer the text-based interface. To run it, log in as root (or use the command su to temporarily change to the root user), and type the command /usr/sbin/printconf-tui from a shell prompt.
 | Do Not Edit /etc/printcap |
|---|---|
Do not edit the /etc/printcap file. Each time the printer daemon (lpd) is started or restarted, a new /etc/printcap file is dynamically created. |
If you want to add a printer without using printconf, edit the /etc/printcap.local file. The entries in /etc/printcap.local are not displayed in printconf but are read by the printer daemon. If you upgrade your system from a previous version of Red Hat Linux, your existing configuration file is converted to the new format used by printconf. Each time a new configuration file is generated by printconf, the old file is saved as /etc/printcap.old.
This chapter explains local printer configuration only, but five types of print queues can be configured with printconf:
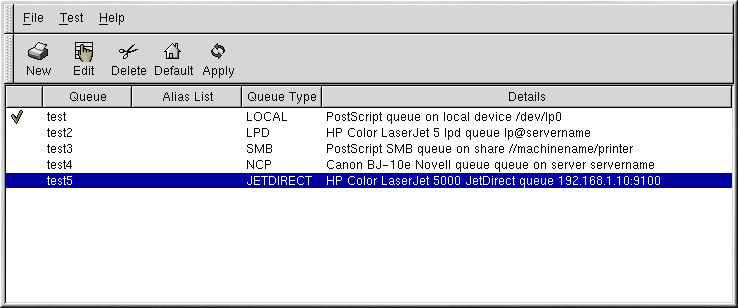
Local Printer — a printer attached directly to your computer through a parallel or USB port. In the main printer list as shown in Figure 7-1, the Queue Type for a local printer is set to LOCAL.
Unix Printer (lpd Spool) — a printer attached to a different UNIX system that can be accessed over a TCP/IP network (or example, a printer attached to another Red Hat Linux system on your network). In the main printer list as shown in Figure 7-1, the Queue Type for a remote UNIX printer is set to LPD.
Windows Printer (SMB) — a printer attached to a different system which is sharing a printer over a SMB network (for example, a printer attached to a Microsoft Windows machine). In the main printer list as shown in Figure 7-1, the Queue Type for a remote Windows printer is set to SMB.
Novell Printer (NCP Queue) — a printer attached to a different system which uses Novell's NetWare network technology. In the main printer list as shown in Figure 7-1, the Queue Type for a remote Novell printer is set to NCP.
JetDirect Printer — a printer connected directly to the network instead of to a computer. In the main printer list as shown in Figure 7-1, the Queue Type for a JetDirect printer is set to JETDIRECT.
See the Official Red Hat Linux Customization Guide or click on the printconf Help button for information on configuring printers other than local.
 | Important |
|---|---|
If you add a new print queue or modify an existing one, you need to restart the printer daemon (lpd) for the changes to take effect. |
Clicking the Apply button saves any changes that you have made and restarts the printer daemon. The changes are not written to the /etc/printcap configuration file until the printer daemon (lpd) is restarted. Alternatively, you can choose File => Save Changes and then choose File => Restart lpd to save your changes and then restart the printer daemon.
If a printer appears in the main printer list with the Queue Type set to INVALID, the printer configuration is missing options that are required for the printer to function properly. To remove this printer from the list, select it from the list and click the Delete button.
Adding a Local Printer
To add a local printer such as one attached to the parallel port or USB port of your computer, click the New button in the main printconf window. The window shown in Figure 7-2 will appear. Click Next to proceed.
You will then see the screen shown in Figure 7-3. Enter a unique name for the printer in the Queue Name text field. This can be any descriptive name for your printer. The printer name cannot contain spaces and must begin with a letter a through z or A through Z. The valid characters are a through z, A through Z, 0 through 9, -, and _.
Select Local Printer from the Queue Type menu, and click Next.
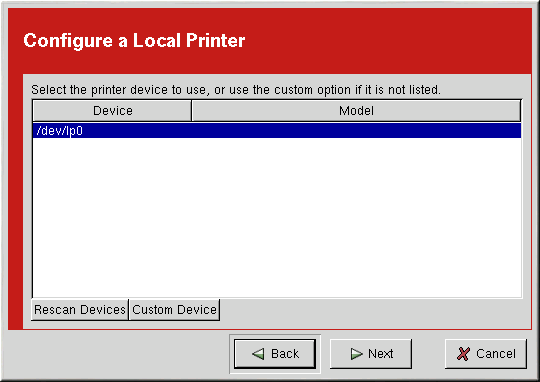
printconf attempts to detect your printer device and display it as shown in Figure 7-4. If your printer device is not shown, click Custom Device. Type the name of your printer device and click OK to add it to the printer device list. After selecting your printer device, click Next.
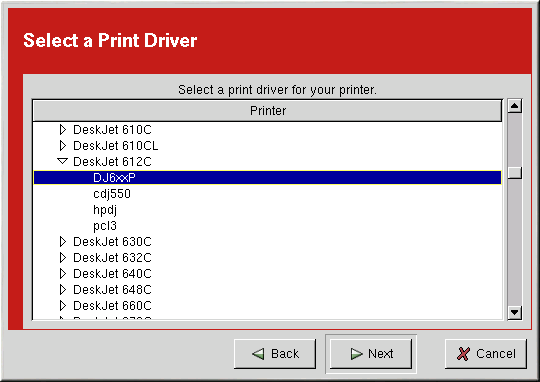
Next, printconf will try to detect which printer is attached to the printer device you selected as shown in Figure 7-5. If it detects the wrong printer or does not detect any printer, you can manually select one. The printers are divided by manufacturers. Click the arrow beside the manufacturer for your printer. Find your printer from the expanded list, and click the arrow beside the printer name. A list of drivers for your printer will appear. Select one. If you do not know which one to use, select the first one in the list. If you are having problems using that driver, edit the printer in printconf and select a different driver.
The last step is to confirm your printer. Click Finish if this is the printer that you want to add. Click Back to modify your printer configuration.
The new printer will appear in the printer list in the main window. Click the Apply button in the main window to save your changes to the /etc/printcap configuration file and restart the printer daemon (lpd). After applying the changes, print a test page to ensure the configuration is correct. Refer to the section called Printing a Test Page for details.
Printing a Test Page
After you have configured your printer, you should print a test page to make sure the printer is functioning properly. To print a test page, select the printer that you want to test from the printer list, and choose Test => Print US Letter Postscript Test Page, Print A4 Postscript Test Page, or Print ASCII Test Page from the pulldown menu. If your printer does not support PostScript printing, choose to print the ASCII test page.


