Chapter 5. Installing Red Hat Linux via Text Mode
This release of Red Hat Linux features a graphical, mouse-based installation program, but you can also install Red Hat Linux using a text mode, keyboard-based installation program. This chapter briefly explains how to use the text mode installation program. Here are some recommendations:
If you are new to Linux installations, read Chapter 4 first. The main focus of the chapter is the graphical installation process, but most of the concepts apply to the text mode installation as well. After reading that chapter, the section called Things You Should Know will give you more in-depth information regarding the aspects of installing Red Hat Linux that do not apply to the graphical installation process.
Additionally, the An Introduction to Disk Partitions appendix in the Official Red Hat Linux Reference Guide may be helpful to you, since it discusses disk partition resizing. If you plan to install Red Hat Linux on a disk where another operating system is currently installed, this knowledge will be crucial.
If you will need PCMCIA support to perform the installation (for example, you are installing on a laptop equipped with a PCMCIA card), you must make PCMCIA boot disks. Chapter 2 explains how to do this.
If you plan to install over a network (via NFS, FTP, or HTTP), you must make a network boot disk. Chapter 2 explains how to do this.
If you have never used the text mode installation program, or need a refresher on its user interface, read the next sections.
To begin installation without further delay, turn to the section called Starting the Installation Program.
Things You Should Know
Before attempting to install Red Hat Linux, you should collect information about your system. This information will help prevent any surprises during the installation. You can find most of this information in the documentation that came with your system, or from the system's vendor or manufacturer.
At the end of Chapter 3 is a table for you to fill out with your specific system requirements, which helps you keep up with any information needed during your installation. Please review the hardware table at Table 3-5.
The most recent list of supported hardware can be found at http://hardware.redhat.com. You should check your hardware against this list before proceeding.
 | Note |
|---|---|
You can perform a text mode installation of Red Hat Linux 7.1 by following the instructions in this chapter. However, if you are installing from a CD-ROM, you might prefer to use the graphical installation mode, which is easy to use and provides a flexible, custom-class installation mode. For more information on graphical installations, turn to Chapter 4. |
Basic Hardware Configuration
You should have a basic understanding of the hardware installed in your computer, including the following:
Hard drive(s) — specifically, the number, size, and type. If you have more than one, it is helpful to know which one is first, second, and so on. It is also good to know if your drives are IDE or SCSI. If you have IDE drives, you should check your computer's BIOS to see if you are accessing them in linear mode. Please refer to your computer's documentation for the proper key sequence to access the BIOS. Note that your computer's BIOS may refer to linear mode by other names, such as "large disk mode." Again, your computer's documentation should be consulted for clarification.
Memory — the amount of RAM installed in your computer.
CD-ROM — most importantly, the unit's interface type (IDE, SCSI, or other interface) and, for non-IDE, non-SCSI CD-ROMs, the make and model number. IDE CD-ROMs (also known as ATAPI) are the most common type of CD-ROM in recently manufactured, PC-compatible computers.
SCSI adapter (if one is present) — the adapter's make and model number.
Network card (if one is present) — the card's make and model number.
Mouse — the mouse's type (serial, PS/2, or bus mouse), protocol (Microsoft, Logitech, MouseMan, etc.), and number of buttons; also, for serial mice, the serial port it is connected to.
On many newer systems, the installation program is able to automatically identify most hardware. However, it is a good idea to collect this information anyway, just to be sure.
Learning About Your Hardware with Windows
If your computer is already running Windows 9x, you can use the following steps to get additional configuration information:
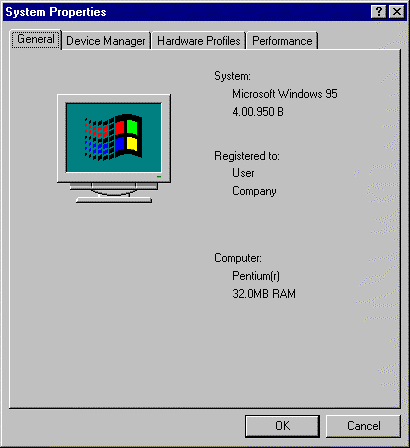
In Windows, click on the My Computer icon using the secondary (normally the right) mouse button. A pop-up menu should appear.
Select Properties. The System Properties window should appear. Note the information listed under Computer — in particular the amount of RAM listed.
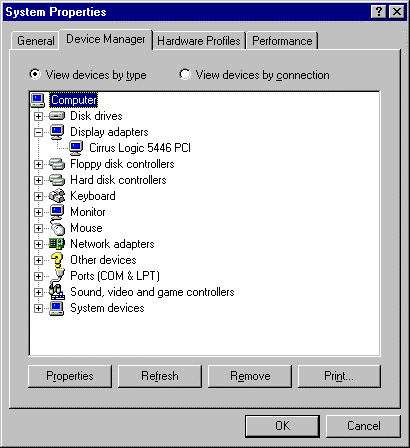
Click on the Device Manager tab. You will then see a graphical representation of your computer's hardware configuration. Make sure the View devices by type radio button is selected.
At this point, you can either double-click on the icons (or single-click on the plus sign +) to look at each entry in more detail. Look under the following icons for more information:
Disk drives — the type (IDE or SCSI) of hard drive will be found here. (IDE drives will normally include the word "IDE," while SCSI drives will not.)
Hard disk controllers — information about your hard drive controller.
CDROM — information about any CD-ROM drives connected to your computer.

Note In some cases, there may be no CD-ROM icon, yet your computer has a functioning CD-ROM drive. This is normal, depending on how Windows was originally installed. In this case, you may be able to learn additional information by looking at the CD-ROM driver loaded in your computer's config.sys file.
Mouse — the type of mouse present on your computer.
Display adapters — if you are interested in running the X Window System, you should write down the information you find here.
Sound, video and game controllers — if your computer has sound capabilities, you will find more information about them here.
Network adapters — information on your computer's network card (if you have one).
SCSI controllers — if your computer uses SCSI peripherals, you will find additional information on the SCSI controller here.
This method is not a complete substitute for opening your computer's case and physically examining each component. However, in many cases it can provide sufficient information to continue with the installation.
 | Note |
|---|---|
This information can also be printed by clicking on the Print button. A second window will appear, allowing you to choose the printer, as well as the type of report. The All Devices and System Summary report type is the most complete. |
Video Configuration
If you will be installing the X Window System, you should also be familiar with the following:
Your video card — the card's make and model number (or the video chipset it uses) and the amount of video RAM it has. (Most PCI-based cards are auto-detected by the installation program.)
Your monitor — the unit's make and model number, along with allowable ranges for horizontal and vertical refresh rates. (Newer models may be auto-detected by the installation program.)
Network-related Information
If you are connected to a network, be sure you know the following:
IP address — usually represented as a set of four numbers separated by dots, such as 10.0.2.15.
Netmask — another set of four numbers separated by dots; an example netmask would be 255.255.248.0.
Gateway IP address — another set of four dot-separated numbers; for example, 10.0.2.254.
One or more name server IP addresses — one or more sets of dot-separated numbers; for example, 10.0.2.1 might be the address of a name server.
Domain name — the name your organization uses; for example, Red Hat has a domain name of redhat.com.
Hostname — the name assigned to your individual system; for example, a computer might be named pooh.
 | Note |
|---|---|
The information provided here is as an example only! Do not use it when you install Red Hat Linux! If you do not know the proper values for your network, ask your network administrator. |

